SSH: Difference between revisions
| Line 78: | Line 78: | ||
=== Dealing with Proxy Time-Out === |
=== Dealing with Proxy Time-Out === |
||
In some case, the proxy might wait for the client (ie. local pc) to send an authentication string as it is the case in the SSL protocol. A solution for this is described in [http://wiki.yobi.be/wiki/Bypass_Proxy#Client_side:_using_socat Yobi]. It consists in sending immediately the client SSH banner, and strip it when it is sent by the client. The solution described uses a custom Perl script as <code>ProxyCommand</code>: '''ssh-tunnel.pl'''. |
In some case, the proxy might wait for the client (ie. local pc) to send an authentication string as it is the case in the SSL protocol. A solution for this is described in [http://wiki.yobi.be/wiki/Bypass_Proxy#Client_side:_using_socat Yobi]. It consists in sending immediately the client SSH banner, and strip it when it is sent by the client. The solution described uses a custom Perl script as <code>ProxyCommand</code>: '''ssh-tunnel.pl'''. |
||
=== ssh-tunnel === |
|||
First install the following packages: |
|||
* <tt>openssh</tt> |
|||
* <tt>openssl</tt> |
|||
* <tt>openssl-dev</tt> (cygwin: <tt>openssl-devel</tt>) |
|||
Launch CPAN: |
|||
<source lang="perl"> |
|||
cpan |
|||
# on first run, autoconfig starts - see wiki for more details |
|||
# Also if proxy must be set, run: |
|||
# o conf init urllist |
|||
# o conf commit |
|||
reload cpan |
|||
install Getopt::Long |
|||
install MIME::Base64 |
|||
install Net::SSLeay |
|||
install IO::Socket::SSL |
|||
install Authen::NTLM |
|||
</source> |
|||
Then install <tt>ssh-tunnel</tt> (if needed, create <tt>~/bin</tt> first and don't forget to add <tt>~/bin</tt> in the path in <tt>.bashrc</tt> before <tt>/usr/bin</tt> and <tt>/usr/local/bin</tt>): |
|||
<source lang="bash"> |
|||
tar -xvzf ssh-tunnel-2.26.tgz |
|||
make install |
|||
#Create an empty ssh banner (will be updated at the first connection) |
|||
touch ~/.ssh/clbanner.txt |
|||
#Create the links |
|||
ln -s /usr/local/bin/ssh.pl ~/bin/ssh |
|||
</source> |
|||
Edit <tt>~/.ssh/config</tt> and <tt>~/.ssh/proxy.conf</tt> as needed. |
|||
== Command-Line == |
== Command-Line == |
||
Revision as of 00:15, 14 December 2010
Reference
On this Wiki:
Tips
On ssh command:
ssh -F hostname                             # Find hostname in ~/.ssh/known_hosts (useful if HashKnowHosts enabled)
ssh -l -f ~/.ssh/known_hosts                # Print fingerprint of known host keys
ssh -Lport:host:hostport hostname sleep 60  # Forward port, and exit after 60s if no connection is made
If a script is to be called as a ssh command, use 1>&2 instead of >/dev/stderr to redirect a message to stderr (if not, you'll get an error undefined /dev/stderr):
#! /bin/bash
# This script is called as an ssh command with
#   ssh hostname thisscript.sh
echo "This will go to stdin"
echo "This will go to stderr" 1>&2
Install
After installing ssh (client & server), you have to create an ssh-key:
ssh-keygen
Configuration
SSH can be configured through file ~/.ssh/config. See man ssh_config for more information. The format is as follows:
# Specific configuration options for host host1
Host host1
  Option1     parameter
  Option2     parameter

# General configuration options for all hosts.
# Options in this section applies if same option was *not already specified* in a relevant host section above.
Host *
  Option1     parameter
  Option2     parameter
The value to use for each option is given by the first section that matches the host specification and that provides a value for that option. So section Host * should always be at the end of the file, since any subsequent section will be ignored.
Connect through a Proxy
SSH can be said to establish the connection to the server through a proxy by using the option ProxyCommand. Example of ProxyCommand in the SSH config file:
# none
  ProxyCommand   none                                            # No proxy
# using nc
  ProxyCommand   /usr/bin/nc -X connect -x 192.0.2.0:8080 %h %p  # Example in ssh_config manpage but DOES NOT WORK
# using connect (or connect-proxy)
  ProxyCommand   /usr/bin/connect %h %p                          # No proxy as well
  ProxyCommand   /usr/bin/connect -H proxyserver:8080 %h %p      # Using HTTP proxy proxyserver:8080
  ProxyCommand   /usr/bin/connect -h %h %p                       # Using HTTP proxy defined in env. var HTTP_PROXY
  ProxyCommand   /usr/bin/connect -S socks5server:1080 %h %p     # Using SOCKS5 proxy server socks5server:1080
  ProxyCommand   /usr/bin/connect -s %h %p                       # Using SOCKS5 proxy defined in env. var SOCKS5_SERVER
  ProxyCommand   /usr/bin/connect -S socks4server:1080 -4 %h %p  # Using SOCKS4 proxy server socks4server:1080
# Using socat
  ProxyCommand   socat -ly - PROXY:proxy:%h:%p,proxyport=8080,proxyauth=user:pass
                                                                 # HTTP Proxy
  ProxyCommand   socat -ly - SOCKS4A:socksserver:%h:%p,socksport=1080,socksuser=user
                                                                 # SOCKS4A proxy (%h is resolved by proxy)
# Using ssh-tunnel
  ProxyCommand   /usr/local/bin/ssh-tunnel.pl -f - - %h %p
If a hostname matches several sections, first match found is used. Use ProxyCommand none to override a default proxy configuration:
Host 192.*
  ProxyCommand none                                              # Otherwise setting in Host * would be taken
Host *
  ProxyCommand /usr/local/bin/ssh-tunnel.pl -f - - %h %p         # Default proxy settings
Dealing with Proxy Time-Out
In some case, the proxy might wait for the client (ie. local pc) to send an authentication string as it is the case in the SSL protocol. A solution for this is described in Yobi. It consists in sending immediately the client SSH banner, and strip it when it is sent by the client. The solution described uses a custom Perl script as ProxyCommand: ssh-tunnel.pl.
ssh-tunnel
First install the following packages:
- openssh
- openssl
- openssl-dev (cygwin: openssl-devel)
Launch CPAN:
cpan
# on first run, autoconfig starts - see wiki for more details
# Also if proxy must be set, run:
#  o conf init urllist
#  o conf commit
reload cpan
install Getopt::Long
install MIME::Base64
install Net::SSLeay
install IO::Socket::SSL
install Authen::NTLM
Then install ssh-tunnel (if needed, create ~/bin first and don't forget to add ~/bin in the path in .bashrc before /usr/bin and /usr/local/bin):
tar -xvzf ssh-tunnel-2.26.tgz
make install
#Create an empty ssh banner (will be updated at the first connection)
touch ~/.ssh/clbanner.txt
#Create the links
ln -s /usr/local/bin/ssh.pl ~/bin/ssh
Edit ~/.ssh/config and ~/.ssh/proxy.conf as needed.
Command-Line
Remote Command Execution
- SSH allows to execute any command on remote SSH host. The syntax is
ssh -t SSH_HOST COMMAND
- To execute a remote command on remote host and stay connected afterwards, use ssh -t, along with bash rcfile, like:
ssh -t SSH_HOST "bash --rcfile PATH_TO_RC_FILE"
Don't miss the quotes around the command. Bash will execute the commands in the rc file, and will open a session. Connection remains open because stdin/stdout is not closed. Option -t allows for connecting with current terminal. Without this option, there will be no terminal connection, so bash would run in batch mode (no prompt), and terminal features like tab completion or color would be missing.
- Another solution is to force bash interactive mode:
ssh SSH_HOST "bash --rcfile PATH_TO_RC_FILE -i"
Since there is no terminal, bash goes by default in non-interactive mode. Interactive mode is forced with option -i, and so prompt will be printed, etc. But this is only a partial solution because there is still no terminal, ie. no color, no TAB auto-completion.
Port Forwarding
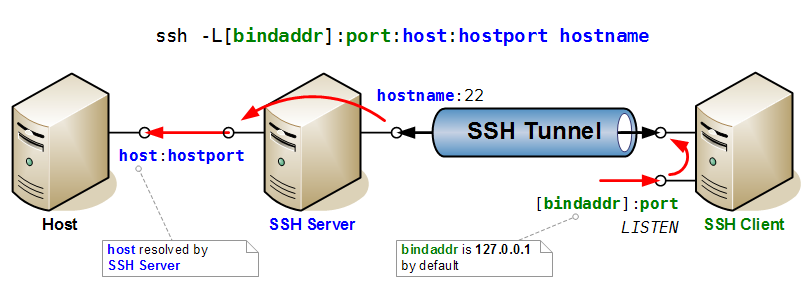
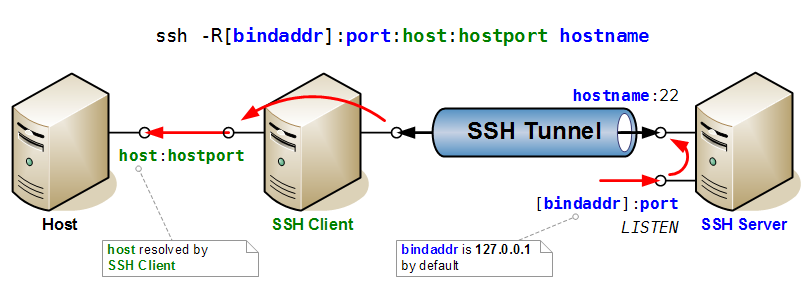
Here two drawings that illustrate very clearly the mechanisms of port forwarding in SSH.
First the case of direct port forwarding, where a port is opened for listening on the SSH Server, and forwarded to a host and port accessible to the client.
Then the case of reverse port forwarding, where a port is opened for listening on the SSH Client, and forwarded to a host and port accessible to the server.

